Angular, how to create a highlighter that conditionally styles the text

Angular highlight for search text
In this example we want to highlight some text inside a page or inside a table.
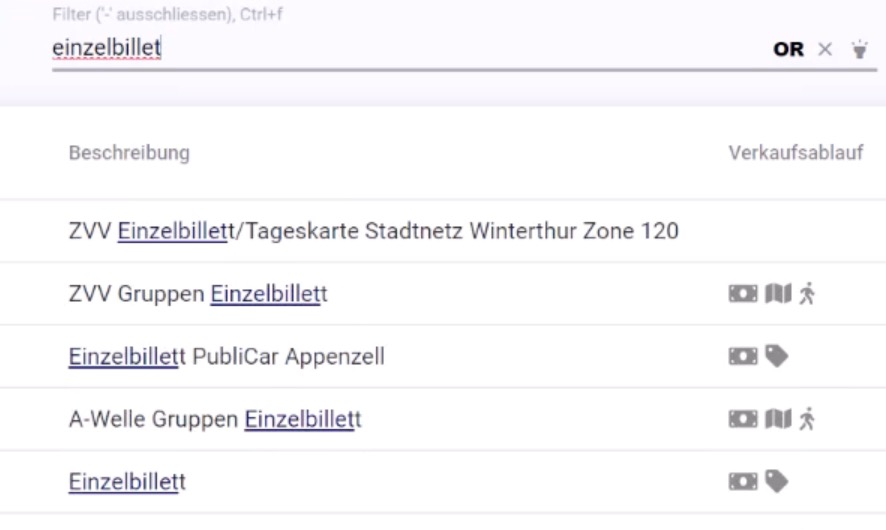
In the image you can see that the text searched ‘einzelbillet’ is dynamically highlighted in the list of answers to better visually find the relevant information.
This filter is applied on thousand of results and reduces the time required for the user to 'scan' the list of results.
In our tutorial we will build something much simpler:
What is the Highlighter Pipe?
The Highlighter Pipe is a custom pipe that allows you to search for specific text within a string and highlight it using CSS styles.
This can be useful in many scenarios, such as searching for keywords within a large document, or highlighting the user's input within a form.
How it works
The Highlighter Pipe is implemented as a class that implements the PipeTransform interface.
The class contains a single method, transform, which is used to manipulate the input text and add the highlighting styles.
The transform method takes three arguments:
text: the text that contains the string to be searched forsearch: the text to be foundcssClass: the CSS class that will be applied to the highlighted text
The pipe starts by checking the input text to make sure it is a string and that there is a text to search for.
If either of these conditions is not met, the original text is returned without any changes.
Next, the search text is transformed into a regular expression pattern.
This pattern is then used to search for the text within the input text using a RegExp object.
Finally, the input text is transformed by replacing the matching text with a span element that has the specified CSS class applied. This allows the highlighting style to be applied to the text.
import { Pipe, PipeTransform } from '@angular/core';
import { DomSanitizer, SafeHtml } from '@angular/platform-browser';

/*
  In the decorator, we define the name of the Pipe that we want to use in our application.
*/
@Pipe({
    name: 'highlighter',
})

/*
  We implement the PipeTransform interface to create a custom Pipe in Angular.
  A Pipe must implement this interface.
*/
export class HighlighterPipe implements PipeTransform {

    /*
      The transform method is the core part of a custom Pipe.
      It takes three parameters:
        - originalText: the text that contains the string to be searched for
        - textToFind: the text to be found
        - cssClass: a styling class to highlight the text (default value: 'highlighter')
    */
    transform(
        originalText: string,
        textToFind,
        cssClass: string = 'highlighter'
    ): string {
        // Check the parameters, if something is missing we simply return the original text.
        if (typeof originalText !== 'string' || !textToFind) {
            return originalText;
        }

        /*
          We create a pattern based on the `textToFind` value.
          We replace some special characters in the string with their escape sequences.
          Then we split the string by spaces and remove empty elements.
          Finally, we join the remaining elements using '|' as the separator.
        */
        const pattern = textToFind
            .replace(/[\-\[\]\/\{\}\(\)\*\+\?\.\\\^\$\|]/g, '\\$&')
            .split(' ')
            .filter((t) => t.length > 0)
            .join('|');

        /*
          Create a regex (regular expression) based on the pattern created above.
          The `gi` flag means "global" (all matches) and "case-insensitive".
        */
        const regex = new RegExp(pattern, 'gi');

        /*
          If `textToFind` exists, replace all the matches with a span element that has the specified css class.
          If `textToFind` doesn't exist, return the original text.
        */
        let result = textToFind
            ? originalText.replace(
                regex,
                (match) => `<span class=${cssClass}">${match}</span>`
            )
            : originalText;

        return result;
    }
}
How to Use the Highlighter Pipe (quick example)
To use the Highlighter Pipe, you simply need to include it in your Angular component and use it within a template expression.
For example:
<p>{{ originalText | highlighter:textToFind:cssClass }}</p>
In this example, originalText is the text that contains the string to be searched for, textToFind is the text to be found, and cssClass is the CSS class that will be applied to the highlighted text.
Transform method
Our transform method (mandatory implementing PipeTransform) receives 3 parameters
transform(originalText: string,textToFind,cssClass: string = 'highlighter'): string {
originalText is the text that has to analyzed and could contain the string to find
textToFind is the string to be searched in the text
cssClass in our case we want to be able to customize the style of the string found. By default we create an highlighter CSS class
Pattern to use in Regex
In our case we want to be able to search multiple words. To do this we create a a pattern to use in a regular expression
const pattern = textToFind
  .replace(/[\-\[\]\/\{\}\(\)\*\+\?\.\\\^\$\|]/g, '\\$&')
  .split(' ')
  .filter((t) => t.length > 0)
  .join('|');
For example, if the textToFind is Angular Rocks the resulting patter will be Angular|Rocks.
Regex
const regex = new RegExp(pattern, 'gi');
The regex searches the pattern previously defined. The parameter ’gi’ means that the pattern has to be searched g globally and can be i insensitive to the case.
In our example Angular 13 rocks will be found and valid.
Return the result
let result = textToFind
  ? originalText.replace(
    regex,
    (match) => `<span class=${cssClass}">${match}</span>`
  )
  : originalText;

return result; // no need to sanitize
In the original text, we will search the regex previously built. If there is a match the text will surround the match with a <span> tag that adds a CSS class and return the result as a simple string .
If no match is found then the original text is sent as result.
For information, we are returning some text with HTML, because our code is basic HTML we don’t need to sanitize the DOM. If you want to use style to modify the color of the text avoiding the external CSS, the result has to be sanitized.
Usage in HTML
Here you have an example of usage of the Pipe
<input type="text" [(ngModel)]="filterText" />
<br />
<p
  [innerHtml]="
    textToShowAsResult | highlighter: filterText:getHighlighterClass()
  "
></p>
Because we could add some html tag to the original text we need to show the result in an element with the [innerHtml] property.
In this example, we call our highlighter pipe with multiple parameters: | highlighter: filterText:getHighlighterClass() .
filterText is the text contained in the ngModel bind to the input text , this is the text that will be searched in the textToShowAsResult variable.
getHighlighterClass() to complicate a bit our example we use a method to dynamically retrieve the CSS class name to be used to color the text.
CSS Style
We use only one class in our example. Very basic.
.highlighter {
  color: red;
  font-size: 1em;
  text-decoration: underline;
}
Component
@Component({
selector: 'my-app',
templateUrl: './app.component.html',
styleUrls: ['./app.component.css'],
encapsulation: ViewEncapsulation.None,
})
export class AppComponent {
public filterText: string = 'Angular rocks';
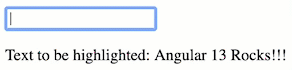
textToShowAsResult = 'Text to be highlighted: Angular 13 Rocks!!!';
getHighlighterClass(): string {
return "'highlighter'";
}
}
Our component is pretty straightforward.
What it is important to note is that we use ViewEncapsulation.None , this allows the defined style to be used in every element present on the page. With the default ViewEncapsulation.Emulated the component cannot access the styles with innerHtml .
Stackblitz
You can test and play with this implementation published on Stackblitz
Conclusion
In this article, we have shown you how to create a highlighter pipe in Angular to highlight a keyword or phrase in a body of text.
This is a simple yet powerful way to improve the user experience in your web applications.