Deploy Angular with Spring Boot in the same executable JAR

Update: Spring 3, Java 21, Angular 17 and WAR deployment
- Sources and alternatives
- Show me the code and how it works ...
- ... now deep dive in the theory
- 3 Maven modules: backend, frontend, delivery
- Deep dive
- Frontend
- Delivery module
- Build and run the application
- How to run the web application
- WAR Deployment (Tomcat, Wildfly etc.)
- Change the typoe of Spring Application
- Server path - Application context different from ROOT
- Docker
- npm WARN EBADENGINE and error after starting the application
Sources and alternatives
GitHub project sources: https://github.com/marco76/SpringAngularDemo
The goal is to build a Spring Boot 3 and Angular 17 minimalistic application with a clean and elegant architecture in a single JAR or WAR.
Alternative solution (frontend build copied inside the backend), many of my Dev friends prefer this alternative. I think it depends on the context:
Java and Angular in one jar/war
Show me the code and how it works ...
If you want the code and / or see it running in your development environment, here you get the instructions.
This demo runs with Angular 17 and Java 21, be sure that your environment can support these frameworks ;).
git clone https://github.com/marco76/SpringAngularDemo.git
cd ./SpringAngularDemo
mvn clean package
java -jar ./delivery/target/MyBeautifulApp-0.0.2-SNAPSHOT.jar
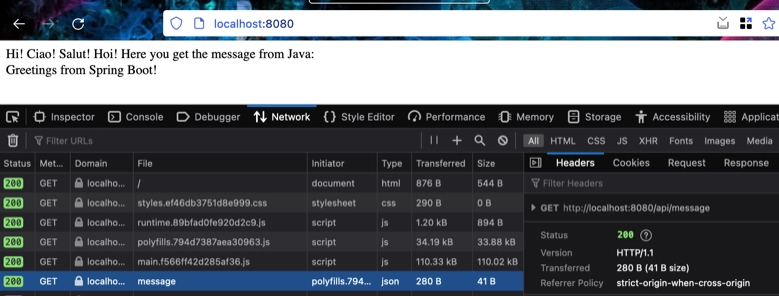
If you run it and everything works correctly you can navigate to localhost:8080 and see ... a simple Angular webapp that calls the Java backend via REST:
... now deep dive in the theory
Goals
- Deploy only 1 JAR (/ WAR)
- Easy to develop with and to maintain
- Independence between modules (frontend, backend, delivery)
- No external dependencies besides standard Angular / Spring / Maven librairies
- Elegant architecture
- Easy integration with external CI/CD pipelines
In the last few years, I published a few examples of integration between Java and Angular (React) projects. They did the job but I didn't like them too much their architecture, in my opinion they were non 'elegant'. My goal is to have a consistent architecture to handle projects that use these frameworks and simplify the workflow for us developers.
Every project and company has different requirements and automated integration systems, for this reason there is no 'best' or 'fit-all' solution.
In this demo example, we build a simple but effective architecture for Angular and Java that can produce a deliverable (JAR) that can be deployed in a Docker container or other CD pipeline.
Compared to the previous solutions I proposed in the blog:
- there are fewer (no) dependencies with external plugins
- the backend is independent of the frontend, it doesn't depend on the static resources built in the frontend and it can run in a separate server
- there is more flexibility for integration with external CI/CD architectures
- the single JAR packaging is an optional extra step. The Angular frontend and the Java backend produce artifacts that can run in separate servers.
I find in general this architecture more elegant than the previous solutions suggested in this blog.
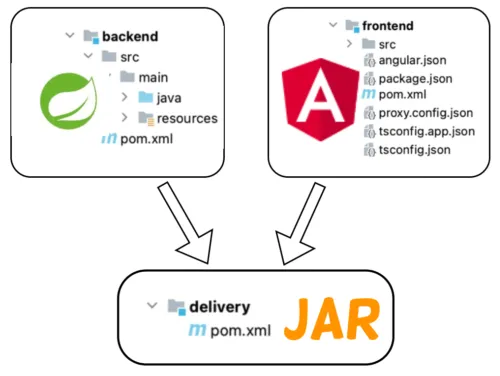
3 Maven modules: backend, frontend, delivery
This solution uses 3 maven modules:
- backend: contains the Java code
- frontend: contains the angular / react code
- delivery: is responsible to assemble the backend and frontend in a final deliverable and (optional) distribute it.
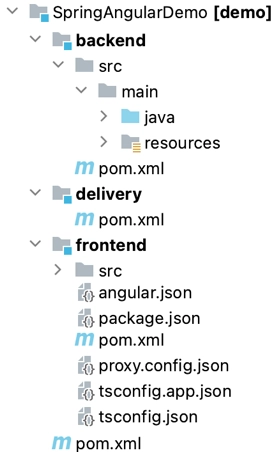
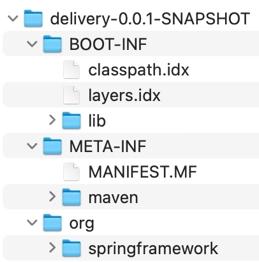
Here the structure of the complete solution:
Compared to the last solution presented in my blog, in this new one backend and frontend are completely independent and can be splitted between teams in different projects.
The third module has been added as an aggregator and could be responsible to deliver to third parties the package.
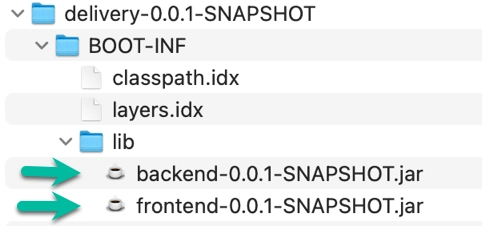
The orchestrator of the operation is Maven which build 2 packages (frontend.jar and backend.jar).
The final JAR contains the 2 artifacts that we created and the dependencies required to run the application.
The solution works because the frontend structure containing the javascript code is compatible with the backend required folder structure for static files. In our case, Spring Boot accepts the files in /static.
When the application starts the packages are opened, the backend and frontend are at this point mixed together.
We simply leverage the features of Maven and Java without complex solutions that unzip / merge / rebuild the artifacts.
Deep dive
Here we look at the different modules in detail. The goal is to understand how this architecture works. The application is really bare-bone.
Main pom.xml
In our main module at the root of the project we define the parent : spring-boot-starter-parent and the modules that are included in the project.
Maven will use this information to build correctly the project.
<?xml version="1.0" encoding="UTF-8"?>
<project xmlns="http://maven.apache.org/POM/4.0.0" [...]>
  <parent>
    <groupId>org.springframework.boot</groupId>
    <artifactId>spring-boot-starter-parent</artifactId>
    <version>3.2.1</version>
  </parent>
  <groupId>dev.marco.demo</groupId>
  <artifactId>parent</artifactId>
  <version>0.0.2-SNAPSHOT</version>
  <packaging>pom</packaging>
  <name>Spring Angular Demo</name>
  <description>Demo project for Spring Boot</description>
	<modules>
      <module>backend</module>
      <module>frontend</module>
      <module>delivery</module>
	</modules>
</project>
Backend
This is a simple minimalist Spring Boot application. We added a controller to serve a response, just to test / show that everything works correctly.
public class HelloController {
  // simple GET response for our example purpose, we return a JSON structure
  @RequestMapping(value = "/api/message", produces = MediaType.APPLICATION_JSON_VALUE)
  public Map<String, String> index() {
    return Collections.singletonMap("message", "Greetings from Spring Boot!");
  }
}
We use api in the endpoints paths. This is a common practice in real-world applications.
When you start your environments locally (frontend with port 4200, backend with port 8080) you will have a CORS error, for this reason we tell Spring that Cross Origin requests from port 4200 are allowed :
@CrossOrigin(origins = {"${app.dev.frontend.local}"})
In a real world application you will need to configure this in a security class or limit this exception to a development profile. When deployed this application won't need this 'exception' because frontend and backend will run on the same server with the same port.
The pom.xml has nothing special:
The module inherits from a parent and it is named backend (you can call it as you wish)
<parent>
  <groupId>dev.marco.demo</groupId>
  <artifactId>parent</artifactId>
  <version>0.0.2-SNAPSHOT</version>
</parent>
<artifactId>backend</artifactId>
The module has only a dependency, without surprise, spring-boot-starter-web.
<dependency>
  <groupId>org.springframework.boot</groupId>
  <artifactId>spring-boot-starter-web</artifactId>
</dependency>
Frontend
The frontend is a standard Angular 15 application, you can create it with ng new inside of the frontend folder.
What we changed inside the default Angular project is the following.
angular.json
We added a proxy configuration to simplify the communication between the development frontend server (port 4200) and backend (8080). I have a post dedicated to this setup: Angular Dev server configuration.
"development": {
 "browserTarget":
	"frontend:build:development",
  "proxyConfig": "proxy.config.json"
}
In the root folder of your Angular project you have to create the following proxy.config.json file:
{
  "/api": {
    "target": "http://localhost:8080",
    "secure": false
  }
}
This code will redirect all the api calls to the local development server.
app.component.html
We removed the original Angular code to simply show the answer from the server:
<div>
  Hi! Ciao! Salut! Hoi!
  Here you get the message from Java:
</div>
<div>
    {{(serverMessage | async)?.message}}
</div>
app.component.ts
Here we have a basic call to the backend:
serverMessage = this.httpClient.get<{message: string}>("api/message");
the proxy will add the correct server url to the endpoint path.
pom.xml
The biggest change and complexity is in the maven configuration of the frontend.
In the pom.xml we add a build configuration:
<build>
  <resources>
    <resource>
      <directory>${basedir}/dist/${app.name}</directory>
      <targetPath>public</targetPath>
      <filtering>false</filtering>
    </resource>
  </resources>
We tell maven to copy the build fields generated by ng build from the directory dist/[your_project_name] and save them in the public folder of the JAR created.
public is accepted by Spring Boot as a destination of static web files.
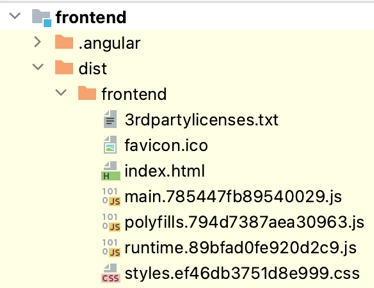
This is the JavaScript code after the build:
and here is where Maven copies it in the JAR:
In the pom.xml we need to add the Exec Maven Plugin, with this plugin maven will build the Angular application calling first npm install followed by ng build in the package phase of Maven:
<plugin>
  <groupId>org.codehaus.mojo</groupId>
    <artifactId>exec-maven-plugin</artifactId>
    <version>3.1.0</version>
    <executions>
      <execution>
        <id>install-dependencies</id>
          <phase>package</phase>
          <goals>
            <goal>exec</goal>
          </goals>
          <configuration><executable>npm</executable>
            <arguments>
              <argument>install</argument></arguments>
          </configuration>
      </execution>
      <execution>
        <id>build-frontend</id>
        <phase>package</phase>
        <goals>
          <goal>exec</goal>
        </goals>
        <configuration>
          <executable>ng</executable>
            <arguments>
              <argument>build</argument>
            </arguments>
        </configuration>
    </execution>
  </executions>
</plugin>
Delivery module
With backend and frontend we build 2 independent JAR files, now we have to prepare the final package to deliver to our server.
The maven delivery module consists in only 1 pom.xml file, I skip the standard (boring) part to concentrate in what is important for us.
<dependencies>
  <dependency>
    <groupId>${project.groupId}</groupId>
      <artifactId>frontend</artifactId><version>${project.version}</version>
  </dependency>

  <dependency>
    <groupId>${project.groupId}</groupId>
      <artifactId>backend</artifactId><version>${project.version}</version>
  </dependency>
</dependencies>
We add the dependencies with the frontend and the backend JAR files, this will import the artifacts in the final JAR.
<build>
  <plugins>
    <plugin>
      <groupId>org.springframework.boot</groupId>
        <artifactId>spring-boot-maven-plugin</artifactId>
        <executions>
          <execution>
            <id>repackage</id>
            <goals>
              <goal>repackage</goal>
            </goals>
        </execution>
      </executions>
      <configuration>
        <mainClass>dev.marco.demo.backend.SpringAngularDemoApplication</mainClass>
        <finalName>MyBeautifulApp-${project.version}</finalName>
        <skip>false</skip>
      </configuration>
    </plugin>
  </plugins>
</build>
Very important, you cannot simply combine the frontend and backend JAR and run the application. This is a Spring application, Spring requires some dependencies and a specific structure in the final JAR.
Here an example of the Spring bootable JAR:
... and where our JARs are copied:
To build this JAR we can use the goal repackage in the spring-boot-maven-plugin. We have to tell Spring where to locate the main class to run:
<mainClass>dev.marco.demo.backend.SpringAngularDemoApplication</mainClass>
We change the final name to prevent Spring to give the module name (delivery) to the JAR deliverable:
<finalName>MyBeautifulApp-${project.version}</finalName>
Build and run the application
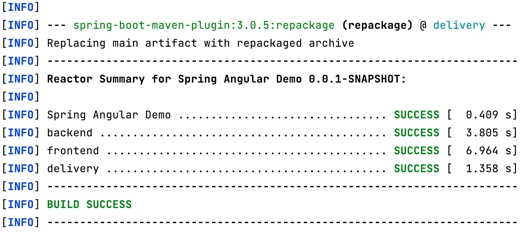
To build the application you can simply run:
mvn clean package from the root (parent) folder of your application.
If everything is ok you should see something like:
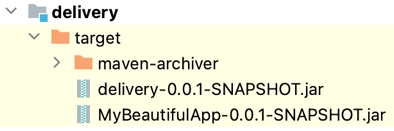
from the same directory you can start the application with maven: java -jar ./delivery/target/MyBeautifulApp-0.0.2-SNAPSHOT.jar
After a few second, you will be able to navigate the new fancy application running as single JAR at port 8080:
How to run the web application
From GitHub
git clone https://github.com/marco76/SpringAngularDemo.git
cd ./SpringAngularDemo
mvn clean package
java -jar ./delivery/target/MyBeautifulApp-0.0.2-SNAPSHOT.jar
Development
For the development you can start and run the 2 separate applications (using the classical ng serveand java -jar or launching from your IDE). The Java application will run on port 8080 and the Angular webapp will run on 4200. We added a proxy in the configuration of Angular, all the requests for the endpoint api will be redirected to the url localhost:8080. This won't apply when deployed in production.
Production
After you build the JAR with mvn clean build in the parent module you will find the package ready to be deployed / run in the delivery module.
You can locally start the application with: java -jar ./delivery/target/MyBeautifulApp-0.0.2-SNAPSHOT.jar
WAR Deployment (Tomcat, Wildfly etc.)
I tend to deploy self-contained JAR, for this reason the main solution is a JAR.
Many projects require a WAR for deployment, for this reason I added a branch (feature/war-for-tomcat) that build a WAR ready to be deployed.
Here you can find the branch: https://github.com/marco76/SpringAngularDemo/tree/feature/war-for-tomcat
For the build process only few changes are required.
Change the typoe of Spring Application
The Application needs to extend SpringBootServletInitializer to be deployed in a Servlet container (Tomcat, etc.):
@SpringBootApplication
// we extend SpringBootServletInitializer
    public class Application extends SpringBootServletInitializer {
Server path - Application context different from ROOT
You can deploy as root renaming the WAR file in ROOT.war or changing the deployment configuration in your application server.
If the application doesn't run on [server]/ but on a different Application context, e.g. '[server]/[AppName]/' you need to adapt the configuration for Angular.
In the file index.html of Angular you need to specify the correct path or the frontend won't find the resources:
Angular documentation: https://angular.io/guide/deployment#the-base-tag
example <base href="/AppName/"> (AppName represents your Application Context)
For the development you don't need to change the path, there is an index.dev.html that uses <base href="/"> and it is started in development mode.
Docker
To run in Docker you can use a similar Dockerfile:
FROM eclipse-temurin:21-jre

RUN mkdir /opt/app
COPY delivery/target/*.jar /opt/app/myApp.jar
CMD ["java", "-jar", "/opt/app/myApp.jar"]
npm WARN EBADENGINE and error after starting the application
If you see a warning similar to
npm WARN cli npm v10.2.5 does not support Node.js v20.1.0. This version of npm supports the following node versions: `^18.17.0 || >=20.5.0`. You can find the latest version at https://nodejs.org/.
npm WARN EBADENGINE Unsupported engine {
npm WARN EBADENGINE   package: '@angular-devkit/architect@0.1700.8',
npm WARN EBADENGINE   required: {
npm WARN EBADENGINE     node: '^18.13.0 || >=20.9.0',
npm WARN EBADENGINE     npm: '^6.11.0 || ^7.5.6 || >=8.0.0',
npm WARN EBADENGINE     yarn: '>= 1.13.0'
and the application starts but there is an error, you need to verify that your npm version and your node version are compatible.
